A customer asks whether you have an invite link. Fair question. Then you open your editor and find that "just add referrals" means a cookie, a signup hook, a webhook handler and a ledger of who owes whom a reward.
This guide shows how to add a referral program to a SaaS app without writing that ledger yourself. By the end you'll have the referral click captured on your landing page, the referral bound to the new account at signup with Better Auth (or Clerk, or Supabase), and the reward landing as credit on the referrer's Stripe bill. You'll test the whole path in a Sandbox Project before a real customer touches it.
The worked example is RefRef. RefRef publishes this blog, so read that as a disclosure as well as a pick. We'd choose it for this job because the whole path lives in one set of docs: one landing script, one signup call, and, with Better Auth or Supabase email signups, no referral tables in your database. The reward ends up where your customer already looks, on their next Stripe invoice.
One opinion before any code: don't store referral state in your own tables if you don't have to. Every row you own is a row you'll reconcile after a refund.
If you're still weighing whether to build all of it yourself, read build vs. buy a referral system first.
How the pieces fit
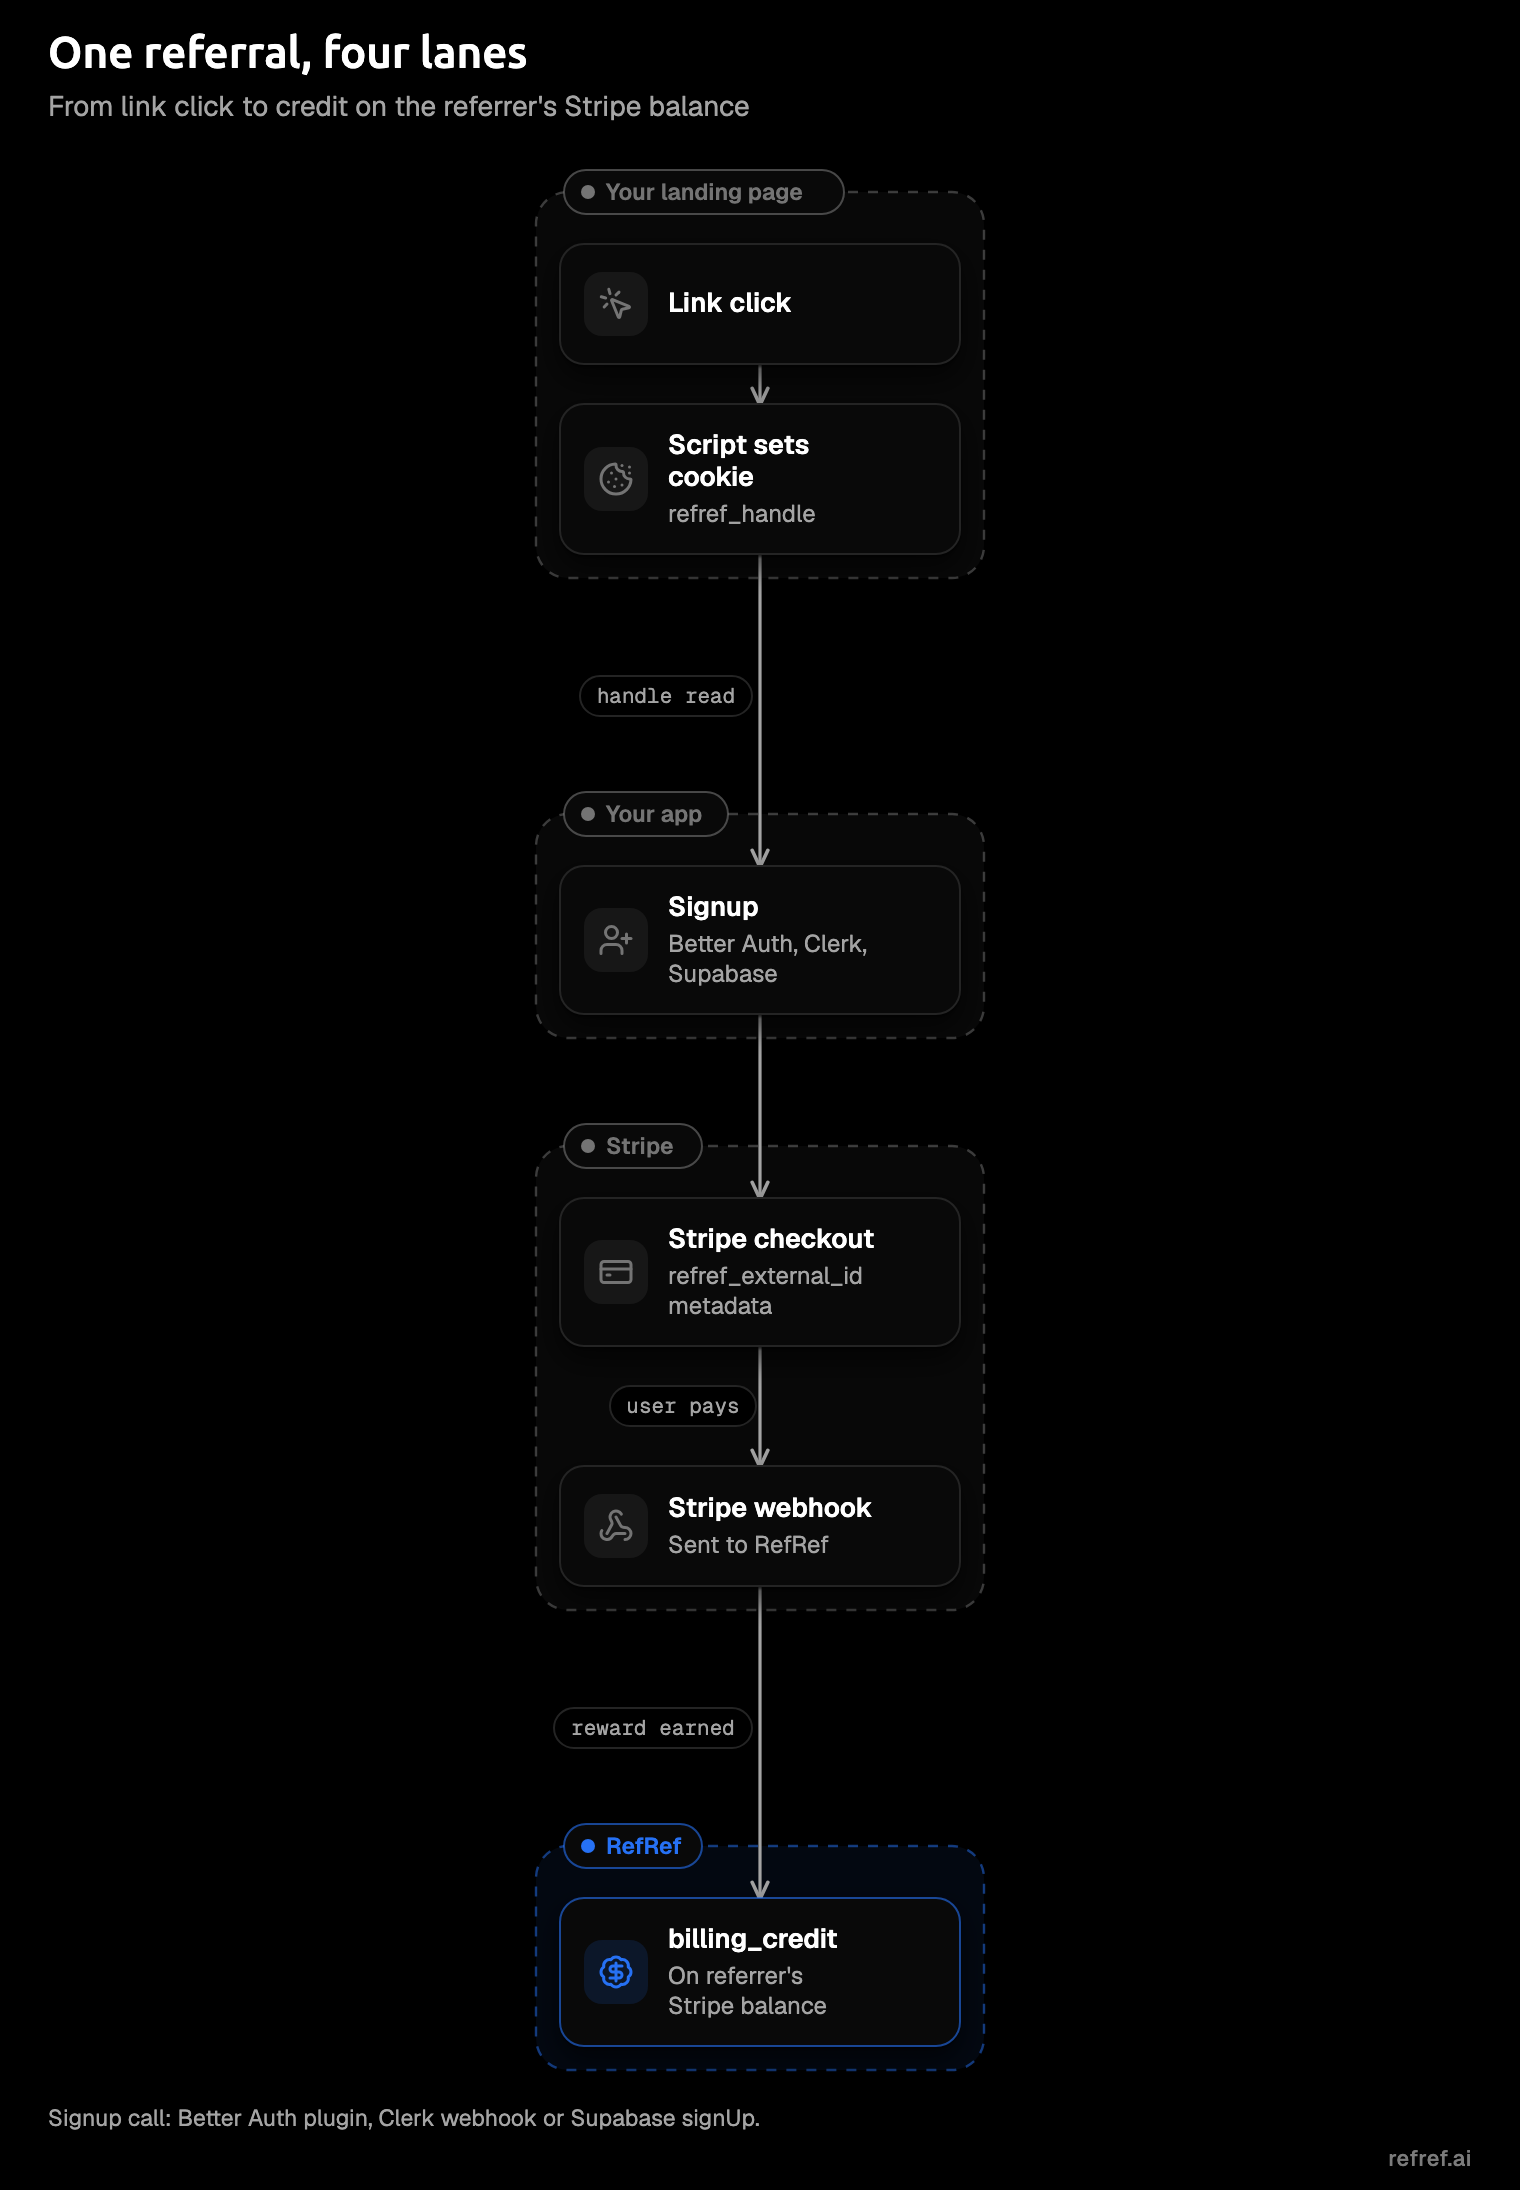
Every referral program in a SaaS app, whichever tool runs it, comes down to three joins: capture the click, bind the referral to a new account at signup, and reward the referrer when that account pays. Miss one and the referral leaks out somewhere between a browser tab and an invoice.
Two terms carry the rest of this guide. Attribution is deciding which referrer gets credit for which new customer. A qualifying event is the action that makes a referral count, and RefRef's defaults are signup and purchase.
In RefRef, each join has an owner you can point to:
- Your landing page runs a script that swaps the click for a first-party cookie,
refref_handle, which lasts 90 days. - Your auth layer sends the signup to RefRef with that handle, which binds the referral to your user.
- Stripe sends the purchase to RefRef through webhooks, so your server doesn't post it.
- RefRef sends the reward back to Stripe as account credit, a single-use promotion code or a plan upgrade.
The landing script does the capture itself, so you don't host a capture endpoint. With Better Auth or Supabase email signups, you don't add referral tables either. Step 3 covers the two small exceptions: an optional cookie route the Better Auth plugin adds for Safari, and one table for Supabase OAuth.
A classic way to lose a referral: the cookie lands on www.example.com, the signup happens on app.example.com, and the two never meet. The referral didn't vanish. It just never made it across the subdomain.
Step 1: Create the program in the Sandbox Project
Whatever tool you use, build your program where fake money can flow first. In RefRef, each Project is a Live and Sandbox pair, and each side has its own IDs, secrets, programs and data.
- Switch the Live | Sandbox toggle in the Console header to Sandbox.
- Open
Programs, choose New, and pick a template or Start from scratch. The program type is fixed once it's created. - Fill in Basics: Program name, Landing page and Currency.
- Under Rewards, choose Add reward rule. Set Event to
purchase, Who earns to the referrer and What to account credit, then set the Amount, Duration and Limit. - On the Review step, choose Save as draft. Go live waits for Step 8.
- Copy a Sandbox API key from Developers, then API keys, and note your Project ID.
Reward on purchase, not signup. A signup reward pays for email addresses; a purchase reward pays for customers. If you want something for the new customer too, give them a discount or credit, because referred customers can't receive cash.
The API key is a Workspace key, so it lives on your server, never in the browser. A Sandbox key works only with Sandbox Projects. When your Live Project rejects it later, that's the key doing its job. The Projects and programs docs cover the remaining settings.
Step 2: Add the attribution script to your landing page
Every referral setup starts with a script on the page the link lands on. Its job is to remember the click in a first-party cookie your backend can read later. RefRef's script is one tag:
<script
  src="https://assets.refref.ai/attribution.v1.js"
  data-api-url="https://api.refref.ai"
  defer
></script>
Put it on every page a referral link can land on, not just the homepage. People share your pricing page and your blog posts too, and a click on a page without the script is a click nobody counted.
Two settings matter if your setup spans more than one host:
- If your marketing site and your app sit on different subdomains, add
data-cookie-domainso the cookie is readable on both. - If you run a Content Security Policy, allow the Assets host in
script-srcand the API host inconnect-src.
A script your CSP blocks fails quietly, which is the least helpful way to fail. The attribution script docs cover both options.
Step 3: Identify the user at signup
Signup is where an anonymous click becomes a person. Whatever your auth stack, the pattern is the same: when the account is created, your server reads the refref_handle cookie and sends it along with your own user ID. What changes from stack to stack is where that call lives.
Better Auth
RefRef's Better Auth plugin is @refrefhq/better-auth on npm, MIT licensed, and it needs better-auth 1.7.6 or later. Install it:
npm install @refrefhq/better-authThen add it to your auth config:
import { betterAuth } from "better-auth";
import { refrefAnalytics } from "@refrefhq/better-auth";

export const auth = betterAuth({
  // ...your configuration
  plugins: [
    refrefAnalytics({
      apiUrl: "https://api.refref.ai",
      apiKey: process.env.REFREF_API_KEY!,
      projectId: process.env.REFREF_PROJECT_ID!,
      resolveSignup: async ({ user }) => ({
        participant: { kind: "individual", externalId: user.id },
      }),
    }),
  ],
});
resolveSignup tells RefRef who the new customer is, using your user ID as the externalId. It has to return the same customer every time it's asked about the same user, so don't build it from anything that changes.
milestone decides when a signup counts, and you set it in the same refrefAnalytics options, next to resolveSignup. The default, account-created, counts as soon as the account exists. email-verified waits until the user confirms their email, and the docs suggest it when your program pays referrers, so an account created with someone else's email doesn't earn. If you use Better Auth's organization plugin, group-created makes the organization the referred customer.
The plugin ignores sign-ins, linking another login method, accounts an admin or your backend creates, and anonymous users. It needs no client secret and no database tables. It also never blocks a signup: if RefRef is unreachable, the plugin retries three times, then hands the failure to onError so you can save it and retry later.
Safari is the one wrinkle. It keeps a script-written cookie for only 7 days, so a click on Monday can be forgotten by the following Tuesday. The plugin includes a server endpoint that re-sets the cookie for 90 days, and you call it after the landing script captures the click:
await window.RefRefAttribution.capture();
await fetch("/api/auth/refref/handle", { method: "POST" });
If you set data-cookie-domain on the script, the plugin's cookieDomain must match it. The Better Auth page has every option.
Clerk
The Clerk recipe is a set of files you copy into a Next.js app, and it sends the signup from a Clerk webhook. You add five files:
lib/refref.tssends the signup to RefRef from your server.lib/refref-metadata.tsbuilds the sign-up metadata in the browser.lib/capture.tswaits for the landing script to capture the click.app/refref-auth.tsxwraps Clerk's sign-up and sign-in components.app/api/clerk/webhook/route.tsreceives the user-created webhook.
Your sign-up page (app/sign-up/[[...sign-up]]/page.tsx) then renders the wrapper, which passes the handle to Clerk's SignUp as unsafeMetadata:
import { RefRefSignUp } from "@/app/refref-auth";

export default function SignUpPage() {
  return <RefRefSignUp />;
}
In Clerk, add a webhook endpoint for user.created at your /api/clerk/webhook route, and store its signing secret as CLERK_WEBHOOK_SIGNING_SECRET. Set REFREF_API_URL, REFREF_API_KEY and REFREF_PROJECT_ID on your server, plus NEXT_PUBLIC_CLERK_SIGN_IN_URL=/sign-in and NEXT_PUBLIC_CLERK_SIGN_UP_URL=/sign-up.
Copy the full files from the Clerk recipe, not from a blog post. Docs get updated; code pasted into an article, this one included, doesn't.
Supabase
The Supabase recipe is one refref.ts file, and email flows need no table. You pass the referral data into signUp or signInWithOtp:
import { cookies } from "next/headers";
import { refrefSignupData } from "./refref";

const data = refrefSignupData((await cookies()).get("refref_handle")?.value);
await supabase.auth.signUp({
  email,
  password,
  options: { data, emailRedirectTo },
});
await supabase.auth.signInWithOtp({
  email,
  options: { data, emailRedirectTo },
});
After the user confirms, send the signup:
import { trackSignup } from "./refref";

const { data } = await supabase.auth.verifyOtp({ token_hash, type });
if (data.user) await trackSignup(data.user);
Then point the Confirm signup and Magic link email templates at a link that brings the token back to your app:
<a href="{{ .RedirectTo }}?token_hash={{ .TokenHash }}&type=email">Confirm</a>OAuth is the one Supabase flow that wants more: an optional SQL migration and a server callback, both long enough that copying beats retyping. The migration adds one table to your database, refref_private.oauth_signup. Take both straight from the Supabase recipe.
Any other backend
Under every recipe sits the same call. If your auth isn't covered, send the signup from your server when the account is created:
await fetch("https://api.refref.ai/v1/track/events", {
  method: "POST",
  headers: { "Content-Type": "application/json", "X-Api-Key": process.env.REFREF_API_KEY! },
  body: JSON.stringify({
    projectId: process.env.REFREF_PROJECT_ID,
    type: "signup",
    participant: { kind: "individual", externalId: user.id },
    identify: { handle: cookies.get("refref_handle") },
  }),
});
Auth0, WorkOS and Auth.js have their own recipes on the auth installation page.
| Stack | Where the signup is sent | What you add |
|---|---|---|
| Better Auth | The plugin, at the milestone you choose | refrefAnalytics in plugins |
| Clerk | The user.created webhook | Recipe files and a webhook secret |
| Supabase, email | Your server, after verifyOtp | One refref.ts file |
| Supabase, OAuth | A server callback route | An SQL migration and helpers |
| Any other backend | Your server, at account creation | One POST /v1/track/events call |
Off Better Auth, Safari is yours to handle: the Clerk and Supabase recipe pages don't include a server-set cookie. The attribution script docs say how to add one. Have your backend re-set the refref_handle cookie on its responses, same value and attributes, and not HttpOnly.
Step 4: Connect Stripe and pass the referral at checkout
A referral tool needs two facts from your billing: that a referred account paid, and who that account is. On Stripe, the first arrives by webhook and the second rides along as checkout metadata.
Connect your Sandbox Project in test mode, since a Sandbox Project pairs with a test-mode key and each Project connects one Stripe account:
- In Stripe, create a secret key or a restricted key in test mode. The Stripe integration page lists the restricted key's permissions.
- In RefRef, open the Project's Settings, then Integrations, choose Stripe, paste the key and select Connect.
- Copy the webhook URL the connection shows. In Stripe, add it as a test-mode webhook endpoint with API version
2026-09-30.endive, subscribed to the events the guide lists. - Paste the endpoint's
whsec_signing secret into RefRef and save. Until you do, RefRef refuses that endpoint's events.
Then tell RefRef who's buying. Stripe knows who paid; the metadata tells RefRef which of your users that is. When your server creates the Checkout Session, put these keys in subscription_data.metadata for a subscription, or in payment_intent_data.metadata for a one-time payment:
refref_external_id: the sameexternalIdyou sent at signup. Required.refref_participant_kind:individual(the default) orgroup.refref_handle: the buyer'srefref_handlecookie. Optional.
The Stripe integration page shows the subscription version:
const session = await stripe.checkout.sessions.create({
  mode: "subscription",
  line_items: [{ price: "price_…", quantity: 1 }],
  subscription_data: {
    metadata: {
      refref_external_id: user.id,
      // Optional: the buyer's browser, for a buyer who did not sign up first.
      ...(request.cookies.refref_handle && {
        refref_handle: request.cookies.refref_handle,
      }),
    },
  },
  success_url: "https://example.com/thanks",
});
Keep the optional refref_handle part. It covers a buyer who reached checkout without signing up first, the one referral that would otherwise slip past Step 3.
With Stripe connected, your server never posts purchases. The integration reads them from Stripe's webhooks, and renewals keep the original referral. That's a webhook handler you don't have to write, or debug on a Friday night.
Metadata location is the easy part to get wrong. Without refref_external_id on the subscription or PaymentIntent, no purchase is recorded, and metadata on the Customer object or on the Checkout Session itself doesn't count, so the referral never qualifies.
If new customers can type a referral code at checkout, know this: a Stripe promotion code that matches a referral code credits one-time payments, but subscription checkouts don't.
If you bill through something RefRef doesn't connect to, your backend posts the purchase itself to POST /v1/track/events, and the qualifying events page covers the details. Amounts are integer strings in minor units, and only fully paid invoices or orders count:
{
  "projectId": "prj_…",
  "type": "purchase",
  "participant": { "kind": "individual", "externalId": "user_42" },
  "purchase": {
    "resourceType": "invoice",
    "externalResourceId": "in_123",
    "paidAt": "2026-10-08T10:00:00.000Z",
    "currency": "USD",
    "currencyExponent": 2,
    "paidAmountMinor": "4900",
    "taxMinor": "0",
    "commissionableAmountMinor": "4900"
  }
}
Step 5: Deliver the reward as Stripe account credit
Stripe already has a place for the reward to land: the customer balance. A negative balance is a credit that Stripe applies to the next finalized invoice in the same currency. Deciding who earned it, when, and what a refund undoes is your referral tool's job.
In RefRef this is the billing_credit reward, labeled account credit. It adds balance credit to the referrer's Stripe customer in USD, EUR, GBP, CAD or AUD. A few rules decide whether it lands:
- It needs a Stripe customer ID. RefRef learns it from the referrer's own invoices and payments, and until it has one, the reward waits.
- Delivery retries. RefRef tries up to 12 times.
- Delivered means accepted. Stripe took the credit; it doesn't mean the referrer has spent it. Earning a reward and delivering it are separate steps.
- Refunds count. A full refund reverses a delivered credit; a partial refund adjusts the reward but leaves the credit in place.
The customer ID is the gap to watch: without one, the reward is earned but waits, undelivered. For a referrer who hasn't paid through Stripe, send their Stripe customer ID as billingIds.stripe with PUT /v1/participants, and if your app already creates a Stripe customer at signup, that's the ID to send. The participants docs show the call:
{
  "projectId": "prj_…",
  "participant": { "kind": "individual", "externalId": "user_42" },
  "name": "Ada Lovelace",
  "email": "ada@example.com",
  "billingIds": { "stripe": "cus_…", "revenuecat": "user_42" }
}
Each billing ID is set once, and a different Stripe customer for the same participant gets a 409 CONFLICT, so send the one you actually bill.
Credit is the reward we'd start with: it costs nothing extra on any RefRef plan, and it only becomes a real cost when the referrer pays their next invoice. To size the amount, how to choose referral rewards walks through a worked model, and the rewards docs list the other reward types.
Step 6: Embed the referral widget
Referrers need somewhere to find their link. A referral widget is the usual answer, and the safe way to tell it who's looking is a short-lived token your server signs, so the browser never holds a secret.
- Copy the client secret from Developers, then Secrets. Only owners and admins can see it.
- Add a server route that signs a token for the signed-in user: an HS256 JWT with
typset torefref-widget+jwt, audiencerefref-widget, and a lifetime of 3 hours or less. - Load
widget.v1.jsfromassets.refref.aiand callinitwith the token. PassgetTokentoo, so the widget can fetch a fresh token when the old one expires. - Style it on the program's Design tab (colors, button text, position, icon, title and share message), then choose Save design changes.
The signing route and the init call are on the widget page, ready to copy. Keep the client secret on your server, and rotate it if it ever leaks.
Put the widget where your users already look for billing or account settings. Nobody hunts for a referral link on the screen they open to get actual work done.
Step 7: Test one referral end to end
A referral setup isn't tested until money has moved and come back. Run one referral through the Sandbox Project the way a customer would:
- Create a referral link for a test participant, then open it in a clean browser on a page with the landing script.
- Sign up as a new user, so the browser is identified.
- Subscribe through checkout with the metadata, and pay with a Stripe test card.
- In the Sandbox Project, check
ReferralsandRewards. A delivered reward shows its Stripe reference. - Fully refund the payment in Stripe, and confirm the credit is reversed on the reward.
Don't skip the refund. It's the case your finance team will ask about first.
If a referral doesn't bind, check these four things before anything else:
- Cookie domain. If your app and site are on different subdomains, set
data-cookie-domain, and match it withcookieDomainin Better Auth. - Safari. An older click needs the server-set cookie from Step 3.
- Metadata location. It goes on the subscription or PaymentIntent, and
refref_external_idmust match theexternalIdyou sent at signup. - Milestone. With
email-verified, nothing counts until your test user clicks the confirmation email.
Step 8: Go live
"Go live" means two separate moves in RefRef, and you need both.
- Rebuild in the Live Project. Nothing copies from Sandbox to Live, so recreate General settings, Secrets, Custom units and Integrations there, with Live keys and a live-mode Stripe key. Rebuild the program too, and switch your app's
REFREF_API_KEYandREFREF_PROJECT_IDto the Live values. - Press Go live on the program. It moves the program from Draft to Live after checking that a reward rule with enabled terms exists, including a referrer reward for referral programs. If you'd rather script it, the API has
GET /v1/programs/{programId}/readinessandPOST /v1/programs/{programId}/publish.
Write the Sandbox setup down as you go. You're doing it twice, and the second time involves real money.
Building it with Claude Code or Codex
If a coding agent is writing this integration, give it the rules before it starts guessing. RefRef's guides for Claude Code and Codex give your agent a rules file (CLAUDE.md or AGENTS.md) and a command that adds RefRef's hosted MCP server. MCP, the Model Context Protocol, is how an agent reads a tool's data and proposes changes to it.
For Claude Code:
claude mcp add --transport http --scope project refref https://mcp.refref.ai/mcpFor Codex:
codex mcp add refref --url https://mcp.refref.ai/mcpBoth guides set REFREF_API_KEY, REFREF_PROJECT_ID and REFREF_PROGRAM_ID. Through MCP, reads run directly, but writes are proposals an owner approves in the Console. The MCP sends no signups either, so the code from Step 3 still does that job.
Your agent can draft the program. It can't approve its own homework. The MCP docs cover the details.
If you're comparing tools
Dub and Rewardful both track Stripe sales. In the guides we opened, as of November 2026, neither shows a reward landing as Stripe account credit, which is the join this guide ends on.
- Dub. It ships a Better Auth plugin,
@dub/better-auth, listed in Better Auth's own docs, plus Clerk and Supabase guides for tracking leads. Those auth guides stop at the lead, and sales come through Dub's Stripe integration. Conversion tracking needs a Business plan or above, shown at $81 a month on Dub's pricing page, which doesn't say whether that's the monthly or the yearly rate. - Rewardful. Its Stripe setup guide and Next.js method don't mention Better Auth, Clerk or Supabase in the pages we opened; the Next.js method passes the referral as
client_reference_idor customer metadata. Plans start at $49 a month, with a 14-day trial. - RefRef. The whole path in this guide runs on the free plan, Sandbox included, and the reward lands inside Stripe. The code is open source.
The weak spot is age. RefRef's Better Auth plugin is at version 0.1.1, while Dub's has been on npm since May 2025 and already sits in Better Auth's docs. The answer is the method above: test the full path in Sandbox, refund included, before a live card touches it. The compare page has more side-by-sides.
FAQ
Does Stripe have a built-in referral program?
Stripe gives you the credit balance, not the referral logic. You can adjust a customer's balance from the Dashboard or the API, and Step 5 shows a referral tool doing that for you.
Do I need a database table for referrals?
Not with Better Auth or Supabase email flows. Neither the plugin nor the recipe needs a table, because RefRef keeps the referral record. Supabase OAuth is the exception: its optional migration adds the refref_private.oauth_signup table from Step 3. Fewer tables, fewer late-night reconciliations.
Does this work with Paddle or Polar?
The signup half does. RefRef also connects to Paddle, Polar, Dodo Payments and RevenueCat, and Step 3 stays the same on all of them. Steps 4 and 5 are written for Stripe, so take the purchase and reward setup from the Paddle or Polar page instead.
Is RefRef free to start?
Yes. There's a free plan for up to 1,000 monthly active participants, with no time limit, and it includes the Sandbox. Monthly active participants are people who did something in your programs that month; clicks and unreferred customers don't count. Paid plans start at $49 a month, or $29 a month billed yearly. Pricing has the details.
Send your first test referral
Start free on RefRef Cloud, build the program in the Sandbox Project, and push one test referral through Stripe test mode, refund and all. The free plan covers that whole Sandbox run, so the only thing the test costs you is attention.
RefRef is open source under AGPLv3, with the code on GitHub. Use RefRef Cloud, or self-host it on your own servers; the docs cover both.